Preserving Beauty
Your handcrafted rug is a lifelong companion for your home. Like any valuable relationship, it thrives on care and attention. Understanding how to maintain your piece will not only preserve its beauty and texture but will ensure its story continues to unfold for decades. This guide is our collective wisdom, passed on to you.
Your Guide to Lasting Luxury
We've compiled answers to the most common questions about rug care. Explore these topics to become an expert in the upkeep of your new heirloom.
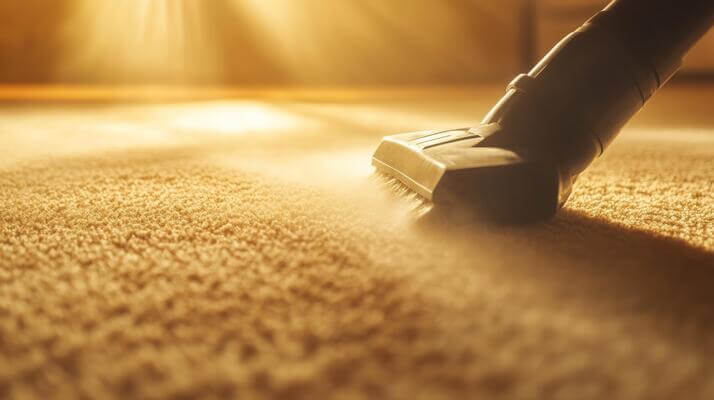
This question, while seemingly simple, is one of the most critical for the long-term health and vitality of your handcrafted rug. The answer is nuanced and depends on several factors, but the underlying
principle is that consistent, correct vacuuming is the single most important maintenance task you can perform. It is not merely about aesthetics; it is about preservation. A comprehensive understanding
involves frequency, technique, and the type of equipment used. Let's break it down into a detailed guide.
Part 1: Determining Vacuuming Frequency
The golden rule is to match your vacuuming schedule to the level of foot traffic the rug endures.
• High-Traffic Areas (e.g., Entryways, Hallways, Main Living Rooms, Kitchen Runners): These areas are subjected to daily wear, accumulating dust, outdoor grit, and microscopic debris. For
these rugs, vacuuming two to three times per week is highly recommended. The abrasive grit brought in on shoes acts like sandpaper, slowly grinding down and severing the delicate wool or
silk fibers. Frequent removal is non-negotiable for preserving the pile.
• Medium-Traffic Areas (e.g., Dining Rooms, Home Offices, Bedrooms): These spaces see less constant use. A thorough vacuuming once per week is generally sufficient to
manage dust and maintain the rug's freshness.
Part 2: The Critical Importance of Technique and Equipment
Using the wrong vacuum or technique can be more damaging than not vacuuming at all.
• The Beater Bar is the Enemy: The most crucial piece of advice is to **disable the beater bar (the rotating brush)**. These aggressive brushes are designed to agitate synthetic,
machine-made carpets to dislodge dirt. On a handcrafted rug, especially one made of wool or silk, this action is destructive. It can tear the hand-tied knots, fray the delicate fibers, and pull them out,
causing irreparable damage and accelerating wear. If your vacuum does not allow you to turn off the beater bar, you must use a different vacuum.
• Choose the Right Vacuum: The ideal vacuum is a canister model with strong, adjustable suction and a dedicated hard-floor or upholstery attachment. This allows you to clean with pure
suction, which is gentle yet effective. Many modern high-end vacuums have settings for delicate rugs that automatically disable the brush and reduce suction.
• Vacuuming Technique: Vacuum in the direction of the pile, not against it. You can determine the direction by running your hand across the surface; one way will feel smooth (with the
pile), and the other will feel rough (against the pile). Vacuuming with the pile helps to lift dirt out while smoothing the fibers and enhancing their natural sheen. Work slowly and methodically in
overlapping rows. Do not rush.
• Caring for Fringes: Never vacuum over the fringes. The suction can easily catch and tear them, causing them to unravel. Instead, use an upholstery brush or attachment and sweep the dirt
away from the rug, or simply lift the rug edge and sweep the debris from underneath.
Part 3: Advanced Maintenance
• Flip and Vacuum the Back: At least once every two to three months, flip the entire rug over and vacuum the back (the warp and weft foundation). This dislodges the deep, embedded grit
that has worked its way through the pile. After vacuuming the back, flip it over and vacuum the front again to pick up all the loosened debris that has fallen out. This is a professional-grade tip that
significantly extends the life of your rug.
• Rotation: As mentioned, rotating your rug 180 degrees every six months is essential. This not only evens out wear from foot traffic but also ensures that your vacuuming habits cover all
areas of the rug equally over time.
In conclusion, viewing vacuuming as a gentle but frequent act of care, rather than a harsh cleaning chore, is the key to ensuring your Artisan Weave Collective rug remains a beautiful and integral part of
your home for generations.
Yes, not only is it normal, but it is an expected and healthy sign of a high-quality, handcrafted new wool rug. This phenomenon, often referred to as "shedding" or "fuzzing," can be alarming to new owners,
but we want to provide a deeply comprehensive explanation to reassure you that this is a temporary phase in your rug's life and is indicative of the natural, premium materials used in its creation.
Part 1: The Science Behind the Shedding
To understand why your rug sheds, we must look at the journey of the wool fiber itself.
• The Staple Fiber: Wool is a "staple" fiber, which means it comes in varying lengths, unlike a "filament" fiber (like silk or nylon) which can be one continuous thread. When raw wool is
gathered, it contains fibers of many different lengths.
• The Spinning Process: These staple fibers are carded (aligned) and then twisted together in a process called spinning to create a single, continuous yarn. During this intricate process,
countless shorter fibers are inevitably trapped within the yarn's structure. They are held in place by the tension and twist of the surrounding longer fibers but are not fully integrated into the core
strength of the yarn.
• The Weaving and Finishing Process: When this yarn is then woven or tufted into a rug, these short, trapped fibers are embedded within the pile. After the rug is complete, the surface pile
is sheared to a uniform height. This shearing process cuts across the tops of the wool yarns, creating millions of tiny, loose fiber fragments at the very surface of the pile.
Part 2: What is Actually Shedding?
What you are seeing in your vacuum cleaner is the gradual release of these two types of loose fibers: the shorter staple fibers that were caught in the yarn and the microscopic fragments from the final
shearing process. It is crucial to understand that this is **not** the structural fiber of the rug breaking or falling out. The core-spun yarn and the hand-tied knots that form the rug's foundation are
incredibly strong and are not affected. The shedding is simply the rug divesting itself of the excess, non-structural fibers left over from its creation. This is a sign that your rug is made from 100%
natural, spun wool, not a synthetic material where fibers are melted and extruded into uniform lengths.
Part 3: Managing the Shedding Phase
The shedding phase is temporary and its duration depends on the rug's construction and the amount of foot traffic it receives.
• Duration: For most hand-tufted or high-pile wool rugs, you can expect the shedding to be most noticeable for the first 3 to 6 months. It will not stop abruptly but will
gradually decrease over time until it becomes negligible.
• The Role of Vacuuming: Gentle, regular vacuuming (with the beater bar disengaged, as detailed in our vacuuming guide) is the best way to manage and expedite the shedding process. It
effectively removes the loose fibers from the surface before they can accumulate. During this initial period, you may need to empty your vacuum canister or bag more frequently. This is normal.
• What to Avoid: Do not be tempted to use an aggressive vacuum with a powerful beater bar in an attempt to "get all the fuzz out" at once. This will not only remove the loose fibers but will
also start to damage the secure, structural fibers, causing your rug to become prematurely worn and thin. Be patient and gentle.
Part 4: When to Be Concerned (And Why It's Almost Never a Concern with Our Rugs)
Excessive, continuous shedding that does not subside after 6-8 months, or shedding that results in a noticeably thinning pile, could be a sign of a low-quality rug made with weak, short-staple wool or a
poor spinning/weaving technique. However, at Artisan Weave Collective, we use only premium, long-staple wools (like Himalayan and New Zealand wool) and partner with master artisans whose spinning and
knotting techniques are designed for maximum durability. The shedding you experience is a healthy and temporary rite of passage for your new rug as it settles into your home. Embrace it as the final touch
of the artisan's workshop, a dusty farewell that gives way to a lifetime of beauty and resilience.
Certainly. Our rugs are crafted to be the functional and foundational centerpiece of a living space, not just a delicate object to be admired from afar. Placing heavy furniture like sofas, beds, tables,
and cabinets on your rug is a standard practice and is perfectly acceptable. However, to ensure that this does not cause long-term damage or unsightly indentations, it is vital to follow a set of best
practices for both prevention and remedy. This comprehensive guide will walk you through everything you need to know.
Part 1: The Physics of Indentations
An indentation, or "dent," is simply the result of concentrated weight pressing down on a specific area of the rug's pile over an extended period. The fibers are not broken or destroyed; they are merely
compressed and matted down, losing their upright orientation. The goal of proper care is to distribute this weight and to regularly de-compress the fibers to maintain the pile's uniform appearance and
texture.
Part 2: The Ultimate Guide to Prevention
Prevention is always superior to a cure. By taking these steps, you can drastically minimize the formation of deep dents.
• Use Furniture Coasters or Cups: This is the single most effective preventative measure. Furniture coasters—small cups or pads made of non-staining plastic, rubber, or felt—are placed
directly under the legs of your furniture. Their purpose is to dramatically increase the surface area over which the weight is distributed. Instead of the entire weight of a sofa leg concentrating on a
one-inch square, a three-inch coaster spreads that same weight over a much larger area, significantly reducing the pressure on any single point of the rug pile. Choose coasters that are wide and have a
smooth, flat bottom.
• Consider Furniture Sliders: For extremely heavy pieces like solid wood armoires or bookcases, large-format furniture sliders can be left in place permanently. These act as oversized
coasters and have the added benefit of making the furniture easier to move for cleaning or rotation.
• Periodic Furniture Shifting: Even with coasters, it's a healthy practice to slightly shift the position of your heavy furniture every few months. Moving a sofa just an inch or two
forward or backward is enough to give the previously compressed fibers a chance to breathe and recover.
• Regular Rotation: Rotating the entire rug 180 degrees every six months, as mentioned in our other guides, also helps by changing the primary pressure points relative to the room's
layout.
Part 3: A Step-by-Step Guide to Removing Dents
If you've moved furniture and discovered indentations, do not despair. The fibers have memory, but they can be retrained.
• Method 1: The Ice Cube Trick (For Deeper Dents): This method uses moisture to gently swell and reset the fibers.
1. Place a single, standard-sized ice cube directly onto the center of the dent. For a long, linear dent (like from the base of a chest), you may need several ice cubes spaced a few inches apart.
2. Allow the ice cube to melt completely and naturally. This provides a slow, steady release of cool water that the fibers can absorb.
3. Once the area is damp (not soaking wet), take the edge of a spoon or a coin and gently agitate the fibers, scraping them back into an upright position. You can also use your fingers to vigorously fluff
the pile.
4. Let the spot air dry completely. Do not apply heat, as this can damage the fibers.
5. Once thoroughly dry, vacuum the area to help blend the restored pile with the surrounding rug.
• Method 2: Steam (For Lighter Dents and Quick Touch-ups): This is a faster method for less severe compression.
1. Use a household steam iron or a handheld garment steamer.
2. **CRITICAL:** Hold the steamer or iron several inches (at least 3-4 inches) **ABOVE** the surface of the rug. **NEVER** allow the hot plate of the iron to make direct contact with the rug fibers, as
this can scorch, melt, or permanently damage them.
3. Apply short bursts of steam to the indented area. The heat and moisture will relax the compressed fibers.
While a rug pad is an additional purchase, we at Artisan Weave Collective do not view it as an optional accessory. We consider a high-quality, appropriate rug pad to be an essential and non-negotiable
component of the overall rug system. Its benefits extend far beyond simple comfort, playing a crucial role in safety, protection of your floors, and, most importantly, the dramatic extension of your
handcrafted rug's lifespan. Failing to use a pad is a false economy that can lead to premature wear and damage. Let's delve into the four critical functions of a rug pad.
1. Safety: The Anchor Against Slipping
This is the most immediate and important function, especially when placing a rug on a hard, smooth surface like hardwood, laminate, tile, or polished concrete. Without a pad, rugs can easily slip and
slide, creating a significant tripping and falling hazard, particularly for children and the elderly. A quality rug pad is engineered with a high-friction surface (often natural rubber) that grips both
the floor and the back of the rug, anchoring it firmly in place. This prevents dangerous bunching, curling at the corners, and unexpected movement when walked upon, providing stability and peace of mind.
2. Longevity: The Shock Absorber for Your Rug
This is the most overlooked but arguably most valuable benefit. Every footstep on your rug creates a downward force that crushes the pile and an upward, abrasive force from the hard floor below. This
constant friction between the rug's backing and the floor slowly grinds away at the foundation weaves of your rug. A rug pad acts as a critical buffer, a "shock absorber" that absorbs the impact of foot
traffic. It creates a soft, resilient layer that cushions the blow, preventing the fibers from being crushed and protecting the delicate backing from direct friction with the floor. This single function
can add years, even decades, to the life of a well-made rug by mitigating the primary cause of mechanical wear. It allows the rug to "breathe" and reduces the stress on the hand-tied knots and foundation.
3. Protection: A Shield for Your Floors
A rug pad also serves to protect the investment you've made in your flooring.
• Preventing Color Transfer: While we use high-quality, colorfast dyes, there is a very small theoretical risk, especially in very humid environments or in the event of a major spill,
that dyes could transfer to the floor beneath. A rug pad creates an impermeable barrier, completely eliminating this risk and protecting light-colored flooring or porous materials like natural stone.
• Stopping Abrasive Wear: The back of some natural fiber rugs can be coarse. Over years of tiny movements, this can slowly abrade and dull the finish of a hardwood floor. A pad provides a
soft, non-abrasive layer between the rug and the floor, preserving your floor's finish.
• Blocking Dirt: A pad helps prevent fine grit and dirt from becoming trapped between the rug and the floor, where it can cause scratches.
4. Comfort & Acoustics: Enhancing the Experience
Finally, a pad enhances the daily experience of your rug.
• Cushioning: It adds an extra layer of soft, resilient cushioning underfoot, making the rug feel thicker, more luxurious, and more comfortable to walk or sit on.
• Sound Dampening: The added density of a rug and pad combination significantly improves a room's acoustics. It absorbs ambient sound, reduces echo, and makes a space feel quieter,
calmer, and more intimate.
Choosing the Right Pad:
Always choose a pad made from quality materials like natural rubber and recycled felt. Avoid cheap, synthetic PVC pads, which can degrade over time and stick to or even damage your floor's finish. The pad
should be cut approximately **one to two inches smaller than your rug on all sides**. This ensures the edges of the rug taper down naturally to the floor and the pad remains completely hidden from view.
Investing in a quality pad is investing in the future of your rug.
Absolutely. The creation of bespoke, custom pieces is not just a service we offer; it is a core part of our identity and a celebration of the unique relationship between an artisan, a designer, and a
client. We believe that a rug should not only fit a room but should feel as if it were born for that space. Our custom commission process is designed to be a collaborative, creative, and seamless journey,
allowing you to bring your unique vision to life with the full support of our design team and the unparalleled skill of our master weavers. This guide provides a comprehensive overview of the
possibilities and the process.
Part 1: The Scope of Customization
Our bespoke program is incredibly flexible. Customization can range from simple adjustments to the creation of a completely new piece of floor art.
• Custom Sizing: This is the most common request. Nearly every design in our existing collections can be woven to your exact dimensions. Whether you need a non-standard runner for a long
hallway, a large-scale rug for a great room, or a specific size to perfectly frame a dining set, we can accommodate it. We will work with you to ensure the pattern is scaled appropriately to maintain its
design integrity at your required size.
• Custom Coloring: Have you fallen in love with a pattern but need it to match a specific color palette? Our designers can work with you to adapt the colors of an existing design. Using
our extensive library of wool and silk yarn poms, we can help you select the perfect hues to complement your interior. We can match colors from fabric swatches, paint chips, or other inspirational
materials.
Part 2: The Bespoke Journey - A Step-by-Step Process
We have refined our process to be clear, transparent, and enjoyable.
Step 1: The Initial Consultation. The journey begins with a conversation. You can reach out to us via our Contact page with your initial ideas. We will connect you with a dedicated design
consultant who will discuss your project's scope, including design, size, color, materials, and budget.
Step 2: Design and Quotation. Based on the consultation, our team will develop a formal proposal. For size and color adjustments, this will include a preliminary quote and lead time. For
a fully custom design, we will create initial digital renderings or sketches to help visualize the concept. This phase includes a detailed quotation for your approval.
Step 3: Rendering and Sample Approval. Once the quote is approved, we move to the final design stage. For custom colorways, we will produce a small, physical sample of the yarn colors for
your approval, so you can see them in your home's lighting. For custom designs, we will provide a detailed, to-scale digital rendering (a "cartoon") that shows the final pattern and color placement. We
will work with you on revisions until you are completely satisfied.
Step 4: The Weave. Upon your final approval of the design and samples, a deposit is placed, and our master artisans begin their work. Your design consultant will keep you informed of the
progress throughout the weaving process.
Step 5: Delivery. The lead time for a custom rug can vary significantly based on size, complexity, and the weaving technique, typically ranging from 12 weeks to 9 months or more for
exceptionally large or intricate pieces. We will provide a clear and realistic timeline from the outset. Once complete, your unique, one-of-a-kind rug is professionally cleaned, inspected, and shipped
directly to you.
Words from Our Weave Enthusiasts
The final, most important step of our process is seeing our creations become part of your home. Here is what some of our customers have to say.